Friday, February 26, 2010

Friday Flaunt - Fourth Ten in '10 Finished

Just to show you we occasionally do have sunny days in an interminably-long Iowa winter, this afternoon I took my finished "Stringing Colors" quilt outdoors to the back deck, to photograph in the sunshine. Yes, we definitely have heaps of snow left, but the sun makes dispositions a little better, even at -7 F (-22C) as it was this morning. Did I say interminably long? The latest buzz is to speculate how long it will be until all the snow melts. One guess was Mother's Day, May 9! Good grief.

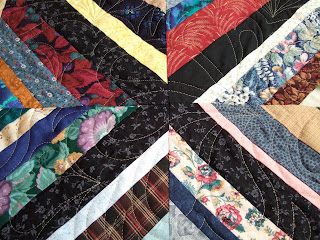
I refilled six bobbins with 50-weight Aurifil to free motion quilt an all-over plume design on this 64" X 80" quilt.
The pattern is from www.Quiltville.com. It's Bonnie Hunter's "String Quilting Primer." I admit this quilt languished, pin-basted, for a year, before I got around to quilting it. So, I'm pleased it's finished, particularly because it was made from "nothing!" A free pattern, leftover strips, ugly fabrics... what's not to like about that?Another quilted piece - just a peek of it for now - is a design that comes from Leah, who has challenged herself to create 365 free motion quilting designs. This is my rendition of her Swirling Petals.

Using my latest stitchery as the centerpiece, I've finished creating this 36" X 38" wallhanging for Riverside Lutheran Bible Camp's quilt auction in July. It was a figure-it-out-as-you-go sort of thing. Scrappy, to use up small pieces of neutrals and greens... and I barely made a dent in my stash.

It seems there's always another quilt top awaiting quilting.
I can't keep up with myself!


With the Riverside stitchery (above) complete, I wanted another project handy to pick up and work on whenever I have a spare moment. Cheryl's cute Josephine Jellyfish, the first block of a free BOM, is just the right size - not too overwhelming to get started with.

Josephine looks a little rippled. Not because she's Under the Sea - though she is! - but because I un-hooped her for this photo. I pencil-colored this piece before stitching. Now, for the first time, I'm using yummy Cosmo embroidery threads. It's as wonderful as everyone claims. So smooth - almost tangle-free - and with a sheen that make it hard to believe it's 100 percent cotton, but it is. This floss is simply a pleasure to stitch with.

The purging, sorting and organizing of last week came to a stop as we've dealt with getting the stuff out of the house. Twenty boxes and bags have been taken away, donated to three different organizations. Not done yet. Just like winter... interminable.

Sunday, February 21, 2010

Fluffy Binding


This fluffy binding technique, also referred to as caterpillar binding, is not of my own design. So I offer here a tutorial of my experience making it.


Quite honestly, it's a little challenging as you'll see at a particular step, but in the end it's worth any extra care you take making it.

Select binding fabric that's loosely woven, like homespun. You'll want fabric that will ravel a bit, and also have the same color on both sides. Batik won't work because it's too densely woven.

You'll need to figure binding yardage according to your own project. Be aware you'll cut 4-1/2" wide bias strips that will be joined to measure the circumference of your quilt.

Through a single layer of your binding fabric, rotary cut a 45-degree angle.

After making the initial cut, fold the cut edge onto the uncut fabric to complete the 45 degree angle cut. You'll have two pieces of fabric.

Turn one piece and align folded bias edges. Rotary cut 4-1/2" strips.
Repeat with the second piece of fabric.
As with other binding techniques, sew a 45 degree angle to join the bias strips, making one strip long enough to edge your quilt.

Fold the binding in half, lengthwise, with seam allowances on the inside. Press a middle fold.
Then press a 3/4" fold on one long edge.

Repeat to press a 3/4" fold on the opposite edge.

Trim your quilt backing and batting to the edge of the quilt top.
This was the step I was most reluctant to do, as I prefer to sew binding to a quilt first, then trim to remove the backing and batting.

Open the pressed binding so only the middle fold is evident.
Align the folded edge of the binding with the edge of the quilt back.

From the back, sew 3/8" from the edge.
I repositioned my sewing machine needle to align 3/8" from the right side of the walking foot.

At the quilt's corner, stop stitching 3/8" from the corner. Backstitch.

This is what it looks like from the quilt front.

As with other binding applications, fold a 45 degree angle, then flip the binding strip "north" and "south." Align the binding fold with quilt edge. Sew, beginning at the top of the quilt, stitching 3/8" from the edge.

Approximately 8" from the "start" tail, stop sewing.
Lay the "end" tail binding over the start tail and overlap them by 1/2".
Cut to remove excess end tail binding.

With other binding techniques this is the point where you'd sew a 45 degree angle, but I found it isn't necessary. Since this seam will be hidden in all the fluff of the finished binding a straight-across sewn seam will suffice.

Lift up the unsewn start and end binding tails.
Open the folds. With right sides together, pin the single layers of binding tails.
Sew a 1/4" seam. Open seam allowance. Finger press to refold middle.

Continue sewing 3/8" from edge to complete sewing binding to the quilt back.

According to the original instructions, the next step is to refold each 3/4" fold, as I've shown. These two, folded edges are supposed to be wrapped from the quilt back to the quilt front. I found it was impossible to keep both folds aligned.

So, instead I folded both 3/4" folds into one another.
First turn in one 3/4" fold. Then wrap the second 3/4" fold over the first fold.

Now wrap that two-layered single fold to the front of the quilt,
pulling the fold past the sewing line by about 1/4".

To me, this was the most awkward step of the binding process.

You'll probably be temped to insert pins from the inside of the quilt to the outer edge of the binding, but pin it as it's shown.

That's because you'll be sewing this binding from the back of the quilt.

From the quilt back, sew 1/4" from the edge of the binding. My sewing machine needle is in the center position, and I'm following the 1/4" mark on the walking foot.

This is the trickiest sewing.

At each corner I struggled as to how to handle the binding.
Open the binding corner and sew into it. Stop. Remove and clip threads. Turn the quilt.
Fold the binding at a 45 degree angle and begin sewing on the diagonal fold.
Here's what the sewn binding looks like from the quilt front.

Use small scissors to cut the folds. Be sure you're clipping the fold on the quilt top side!
Since there's a second fold inside the outer fold, you may need to clip each fold separately.

You will see four separate layers along the quilt front.
The fold along the edge of the quilt remains a fold to encase the quilt sandwich.

Machine wash and dry to make the binding fluffy. Use a toothbrush to make it more raggy-looking.
I hope this technique turns out for you. It definitely gives a quilt a different look.

Saturday, February 20, 2010

Snow and More Snow

I'm eating my words. I posted this yesterday: "No more snow has fallen!" Within hours of blogging that, the snow began and continued into the evening to add another 4.3 inches (11 cm) to our already record-setting snowfall total.

As of today, we've had 61.1 inches (155 cm) of snow, and another storm is predicted this weekend. At this point some Iowans have resorted to actively cheering on the possibility of breaking the 72 inch (182 cm) record set in 1911-1912. After all, it's only February.

On the more serious side, the potential for spring flooding increases with every additional inch of snow. With the ground saturated, and mountains of spring-melting snow, flooding is a concern, especially in river cities like Des Moines and Cedar Rapids. Who can forget our flood of 1993 when Des Moines drinking water was contaminated, we sand-bagged our water treatment facility in West Des Moines, and everyone experienced water-rationing?

This photo was taken by a KCCI-TV photographer. Someone has a wonderful sense of humor about pot-holes.
For those who haven't had this Iowa experience, it's holes that happens when a crack in the road fills with water (snow or ice) and repeatedly freezes and thaws. Some streets offer a pretty bumpy ride!

Here's Dan, doing his regular duty as snow removal expert!
The retired men in the neighborhood are occasionally outdoors, removing snow at the same time.
Tom, Dan and Tom display the tools of trade. Tom on the right is brandishing his homemade roof rake, for scraping the heavy snow off the roof.
Our house and big snow piles.
I'd guess that most postal delivery people are more than tired of having to put mail into boxes buried in snow.
That's Hogan, watching the world from his window perch. Indoors is about the best place to be these days.

Friday, February 19, 2010

Friday Flaunt - Third Ten in '10 Finished

Yippie yi-yo-ki-yay!

Today I completed baby "Eric's" quilt. It's 48" X 48", comprised of disappearing nine patch blocks, a cowboy themed focus fabric, and two embroidered blocks. "Yippie yi-yo-ki-yay" still needs a label, but that has to wait for Eric's birth - when his real name will be revealed! - and I can include his birth date, weight, and length.
A unique aspect of this quilt is the binding. I followed instructions from a 2005 issue of Love of Quilting to make "caterpillar" binding. It's made with a loosely woven fabric, like homespun, that has the same color on both sides. Thanks to my friend, Michelle, who has a stash as good as a fabric store, the perfect royal blue and yellow plaid fabric now edges this quilt.
This binding was a bit tricky to sew, but I like it because it's different. If you'd like to try it for yourself, I'll be posting a tutorial soon.
I've also completed "greenwork" on this 12-1/2" X 12-1/2" (unfinished) stitchery that will become the center of a wallhanging I'll donate to this year's annual Riverside Lutheran Bible Camp (Story City, Iowa) quilt auction. Here's the link to pictures from the 2009 auction.

This pattern came from Wellington House Designs, one of the North Woods Memories blocks.

This week I also managed a little machine quilting every day. I've been quilting this "Plume" design, by Marilyn Badger.
Plumes are all over this string-pieced quilt I sewed and pin-basted a year ago!
It's a Bonnie Hunter pattern from www.Quiltville.com.

I'm pleased with the allover design, but it takes a long time to machine quilt 64" X 80". So far, I've filled and emptied four bobbins of #50-weight Aurifil.
It's been a good week. No more snow has fallen! And sweet, retired hubby washed my VW Bug for me. It doesn't take a whole lot to make me happy.

Hope you're having fun with quilty things.

Wednesday, February 17, 2010

Online Shopping

It isn't often that I shop online. We have several lovely shops in our area that mostly satisfy my quilting needs. And even when looking for stitchery supplies, I can usually find what I want. However, after checking a dozen places throughout Iowa, as well as Omaha (Nebraska), for Cosmo six-strand embroidery floss by Lecien of Japan, I resorted to buying it online.

This is what arrived today, and doesn't it look yummy?! It just glistens.
This purchase is Julie's fault! She used Cosmo to stitch an adorable cushion design called "Babuska" also known as matryoshka dolls. She told me how wonderful Cosmo is to work with, doesn't knot, lays nice on the fabric... and there. I had to have it. Forty of the 443 colors are now mine.

I'll use Cosmo to stitch "Under the Sea," a free BOM being offered by Cheryl Goss of Willowberry Designs. The nine-month BOM began in January, but I hope to catch up.

Since I was already placing the order for Cosmo, it seemed smart to order this sale-priced palm fabric. Ya just never know when palm fabric might be needed. I'm pretty sure I have to blame this on Julie too.
If you want some Cosmo for yourself you might like to know I bought mine at Strawberry Patches in Bakersfield, California. The shop carries all the colors, and I had my order within two business days. In my book, that's great customer service.

Have a blessed Ash Wednesday.

LinkWithin

Related Posts Widget for Blogs by LinkWithin